What is shotcrete
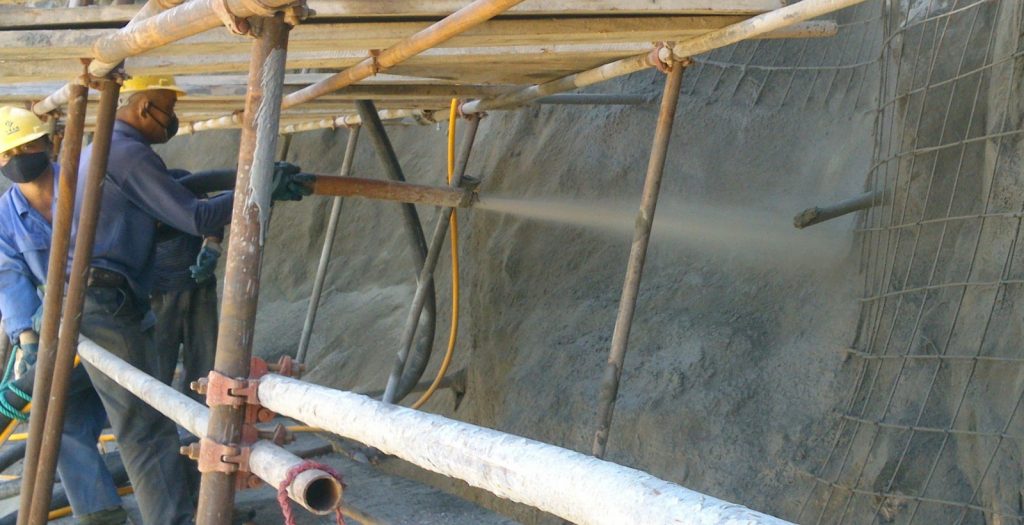
Shotcrete is more of a concreting method rather than a concrete type. It can simply describe as shooting concrete. A pioneer American taxidermist and sculptor Mr. Carl Ethan Akeley develop this method using his sculpting idea to repair the front wall of the Field Columbian museum building in Chicago in 1907. This incorporates a fine concrete mix pressurized by air, sprayed to the working surface. High-speed projection of material sticks and hardened according to the desired shape. Shotcrete is considered as structural type concrete. The process is speedier than conventional concrete when placing on complex shapes. Due to the high velocity (60 – 80 mph) projection of materials, it doesn’t require any compaction.

Shotcreting is a widely recognized concreting method in the construction field. The concept of this process is simple. Fine concrete mix is sprayed using pressurized air with 1-inch layers is what you all do in shotcreting. The mix is tuned to have enough adhesiveness so the material that projects to the surface stays until it hardens.
Machines involved
The process involves delivery trucks, shotcrete gun or concrete pump, an air compressor, controlled water supply, nozzle and experienced nozzle-man to cover all key activities. The mix can deliver to the site by typical agitator trucks. Depending on the dry or wet type you have to use a shotcrete gun or a concrete pump to run the material to nozzle end. Nozzleman at the end sprays the shotcrete with thin layers covering all the area. You can lightly trowel or screed the surface for the better finish within the initial setting period of the mix.
Features
One major characteristic with shotcrete is there won’t be any compaction after placement as we do in concrete construction. Due to air pressure by the compressor, the material projects into the surface and stack tightly. This means that requirement of compaction is already fulfilling by the placing method.
Another advantage is, there won’t be cold joints even you hold the work for some time. Just remove the top loose surface, the high-velocity material flow will stack tightly on the previous shotcrete giving you enough bond.
Generally, shotcrete needs to cure for more than 7 days at least. If the weather condition is unfavorable it is good to improve the curing method, quality, and duration accordingly. The more you cure the quality of the shotcrete improves.
The basic materials of shotcrete are the same as the materials in the concrete mix. However, in shotcrete, the maximum aggregate size is kept smaller to spray easily and control rebound wastage. Coarser material tends to rebound more and try to separate from the mix when placing.
Similar to the conventional concrete, the strength of shotcrete is depending on the water to cement ratio. In most cases, this ratio is maintained between 0.35 and 0.45 and achieves compressive strengths around 4500 – 8500 psi (30-60 MPa). American concrete institute has specified the minimum compressive value as 4000 psi (27.5 Mpa) for water retaining uses like swimming pools. However, with the right mix proportions and right procedures, you can achieve more than 5000 psi easily (34.5 Mpa). Cement content is generally keeping around 350-450 kg/m3 to create gluey consistency. As a result of that shotcrete shows a better bond between particles when compared to concrete.
Material
Supplementary cementitious material (SCM) Fly ash, Slag, and silica fume can enhance the performance of the mix in pumping ability, density, water tightness, and heat of hydration during hardening. It also economically optimize the mix. However, using these SCM materials can cause more harm than help if you use without any consultation of mix designer.
Conventional steel reinforcement and fiber reinforcement is usable with shotcrete. When using steel reinforcements prior installment and check are necessary before shotcrete. However, in fiber reinforcements, the fiber material is included in the mix. Both liquid and dry admixtures are suitable for shotcrete. Typically the admixture amount is controlled between 1 – 4 % of cement content.
Wet & Dry process
There are two shotcreting methods available for construction. The dry process, which the trade name ‘Gunite’ developed earlier in 1907. Then the wet mix process introduced in 1950 times. Both these methods have their own strengths and weaknesses. However, most of the time, both methods are equally applicable and perform excellent if you do it right.
Dry mix method
As mentioned in the name this method uses a dry shotcrete mix. Gunite is the common name for this method in the industry. Shotcrete gun coupled with an air compressor drive the material to the nozzle. Separate water line brings water to the nozzle and both the mix and water will spray while mixing. Nozzle-man holds great responsibility in this process because maintaining the right amount of water content is the key to quality shotcrete construction.
Since it’s not practical to check characteristics of dry mix in a laboratory the best thing is to do field tests. Some of the common tests are as follows.
- Visual inspection of placing, finishing, and surface for any defects such as laitance, loose material, cracking, sloughing, and sagging.
- Prepare test panels of 460 mm by 460 mm nominal size with a thickness of 150 mm to core out samples for compressive testing after 28 days of placing.
- The temperature of fresh shotcrete immediately after placement.
Wet-mix method
This is more like concrete placement. All the material including water is mixed in the batching plant and sent to the site. A typical concrete pump can push the material to the shotcreting location. A separate air compressor connects to the nozzle generates the pressure force required for spraying.
With the wet mix, nozzle-man doesn’t have to control water content. This releases nozzle-man from few responsibilities. However skilled and experienced nozzle-men is a major requirement for shotcreting. There are training programs and certification processes for shotcrete nozzle operators. One such program is the Nozzle-man certification program by the American shotcrete institute. There is another certification package for shotcrete contractors & inspectors too.
Gunite or shotcrete
One of the popular queries in the shotcrete construction is selecting a suitable shotcrete type. In most cases, both dry mix and the wet mix are applicable for the work. However, both methods have their own features.
The most highlighted advantage with the dry mix is you can stop the work at any time and re-use the material because they are dry. But with the wet mix, you have to remove the material and send the truck back after the initial setting time.
Similarities and differences between both methods are tabulated below.
| Dry method (Gunite) | Wet method | |
| Similarities | Easy start-up | |
| Speedy construction | ||
| Admixture compatible | ||
| Few or no formwork requirement | ||
| Differences | Easy to pump | |
| Minimum pumping rate 650 cfm | Minimum pumping rate 250 cfm | |
| High placing rate | ||
| Less dust | ||
| Typical Water/Cement = 0.35 | Typical Water/Cement = 0.45 | |
| Skilled nozzle-man is required to control the consistency of the mix | ||
| Good bond strength | ||
| Air void structure is not possible | ||
Select the suitable shotcrete type for your work considering the following.
- Machine availability
- Economy
- Contractor’s experience
- Mix designer’s recommendation
- Admixtures using
Applications
Shotcreting is good for repairing works. It is the initial reason to develop this method. Evaluation through 100 years make the shotcrete more advance and expand the possibilities. Common uses of shotcrete are as follows.
- Ground stabilization: Shotcrete is widely using in tunneling excavations, slope protection works, and mining works. It’s perfect for this type of construction because shotcrete is easy to arrange with less labor force. Quick strength increases, minimum cyclic time, and good water retention capabilities make shotcrete more suitable than conventional concrete for ground stabilization works.
- Repair and retrofitting: Bridges, parking areas, dams and reservoir seismic retrofitting, sewers are the most common places you can use shotcrete repairs. Its excellent compatibility with complex geometries is the advantage here. Shotcrete can effectively cover the defective area and improve structural performance with less amount of work. Cement plants, petroleum refineries, and industrial melting chambers often use shotcrete for their repairs because the downtime of the plant is less. Shotcrete can install with less amount of prior works.
- Domes and pools: Shotcrete is widely used for pools and dome-like structures. Shotcrete domes are economical and sustainable. Few or no amount of formwork requirement and easy installation makes this method popular among contractors.
How to apply shotcrete
Few points to check during shotcreting are mentioned down.
- Arrange right and reliable machinery
- Prepare the working platform
- Make the working surface rough enough so that shotcrete bond well
- Sandblasting is a good method to roughen smooth surfaces
- Install the forms
- Check they are structurally sound
- Apply form oil
- Arrange methods to divert any water paths coming through the surface.
- Clean the working surface and install reinforcement if required.
- Attach shotcreting strips and guide wires to maintain the shotcreting thickness
- Wet the surface at least 3 hrs. before placement
- Verify the materials and start mixing
- Check the quality of all materials according to their specifications
- Check whether the nozzle-man is certified for the job and do a test shotcrete panel
- Make sure to start the shotcrete between 40 F – 90 F temperatures. Stop the work if the temperature drops below 40 F during shotcreting
- Start the shotcrete and do the test panels during the placement
- Do the corners first
- Don’t apply shotcrete more than the required thickness. The material can collapse or sags down
- Try to finish each batch within 1.5 hrs. If the temperature is in the upper limit, try to finish the batch within 45 minutes
- Place with one inch thick layers and cover from bottom to top.
- Do not use rebound materials
- Make sure the projection is perpendicular to the surface.
- Keep the layer intervals as low as possible to avoid week bonding & cold joints
- If any interruption occurs, the best practice is to shape and finish the progressing layer.
- Finish the surface immediately after the placement. Smooth finish is possible to achieve by screeding.
- Keep the shotcrete wet constantly at least one week time
- Core out the samples from test panels and test for strengths
- If specified in the methodology, do the pull-out test

